> ## Documentation Index
> Fetch the complete documentation index at: https://benchgen.com/docs/llms.txt
> Use this file to discover all available pages before exploring further.
# Upload a Model
> Bring your own base model into Train: which formats can be fine-tuned, what the archive should contain, and HuggingFace examples.
The **Base Model** picker in [Fine-tune a Model](/docs/train/fine-tune-a-model) can search HuggingFace directly, but this page is about the other path: uploading your own weights as a `.zip`, the same flow whether you start it from Eval's Models page or from Train. It's the same **Add Model** screen either way, so the steps below walk it end to end, focused on the **File** tab rather than the HuggingFace search tab.
## Step 1: Open Models and click Add Model
In the left sidebar, click **Models**, then **+ Add Model** in the top right.
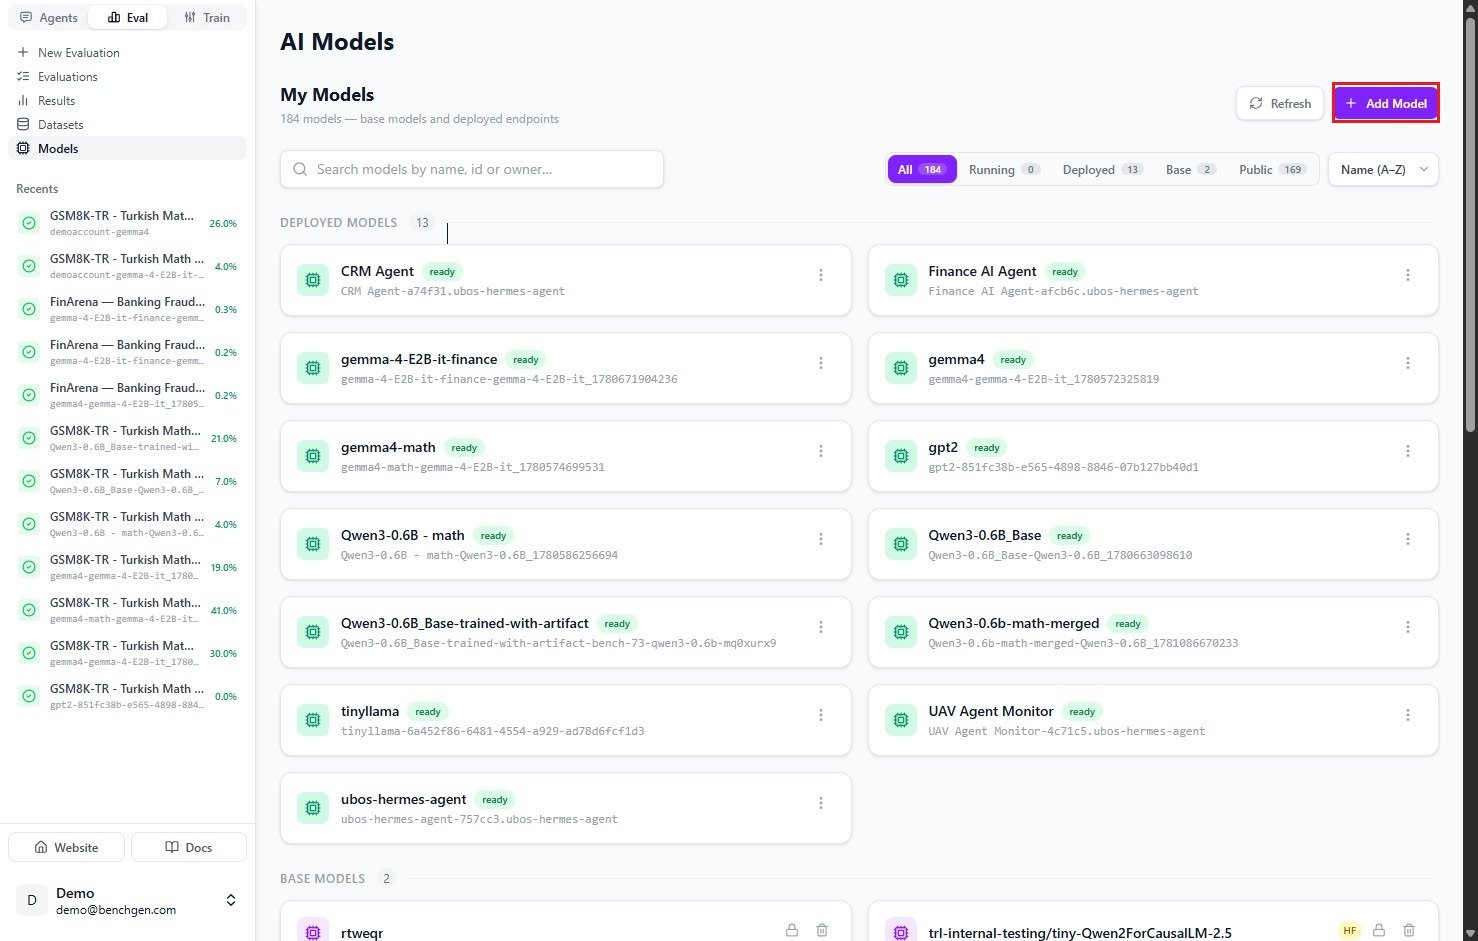 This is the same Models list Eval uses, every model you register here, uploaded or imported, is available to both Eval benchmarks and Train fine-tuning jobs. You don't register a model twice for the two sections.
## Step 2: Name the model
Give it a name and, optionally, a short description, then click **Add Model** to continue.
This is the same Models list Eval uses, every model you register here, uploaded or imported, is available to both Eval benchmarks and Train fine-tuning jobs. You don't register a model twice for the two sections.
## Step 2: Name the model
Give it a name and, optionally, a short description, then click **Add Model** to continue.
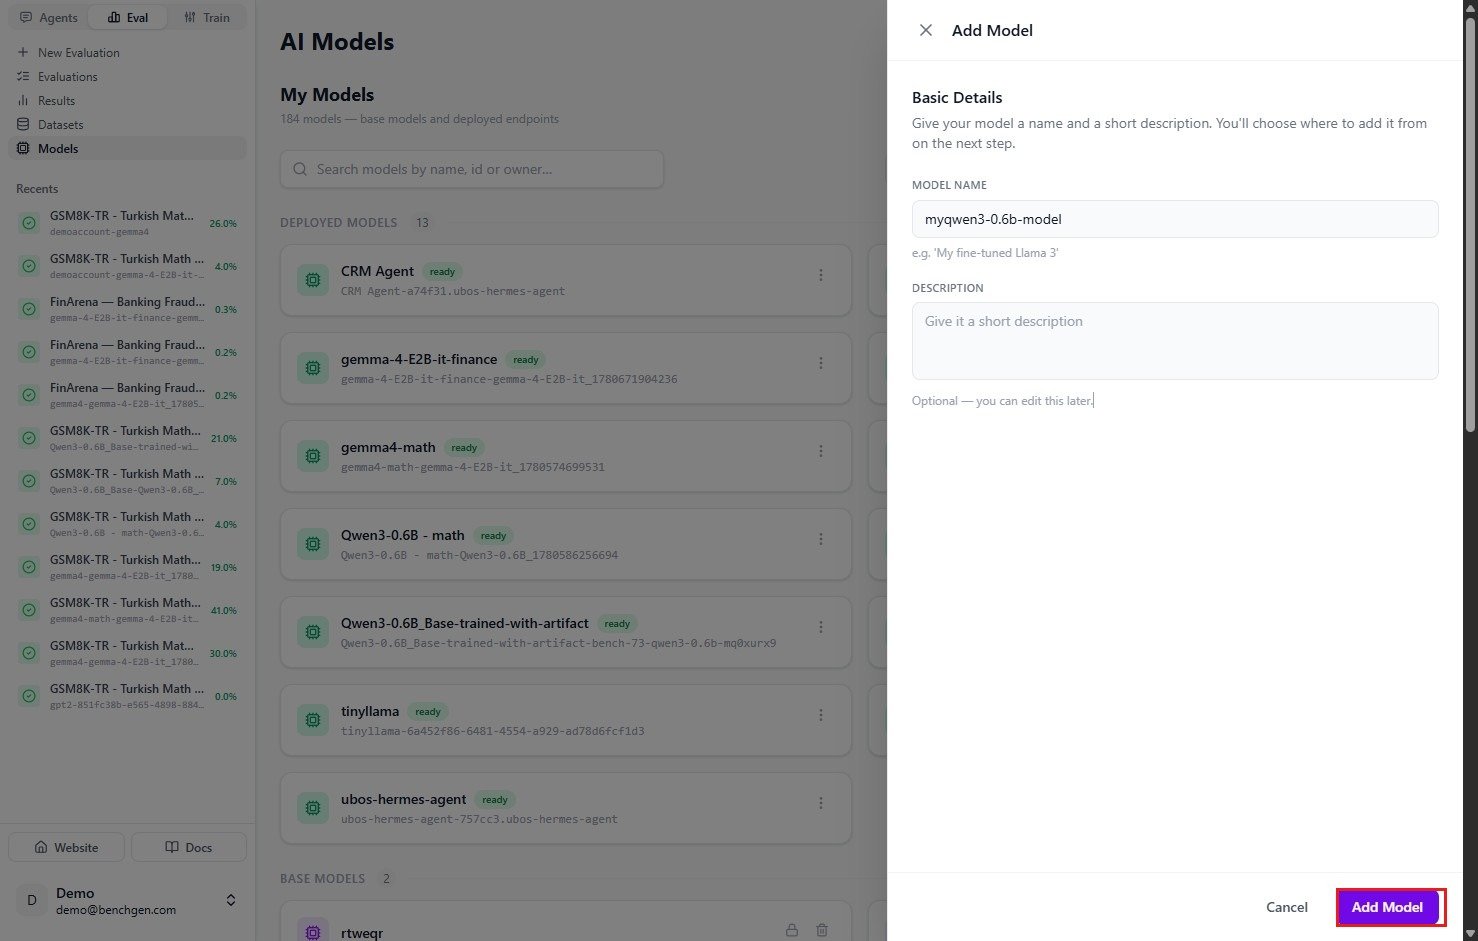 The model is created as a **Draft** at this point, nothing is uploaded yet. Naming happens before you pick a source because the same draft can be filled in either way, by file or by HuggingFace, on the next screen.
## Step 3: Upload the archive on the File tab
The model card opens on an **Add Model** card with two tabs, **File** and **HF model**. Stay on **File**: drag and drop your `.zip` onto the dashed area, or click **Browse Files**.
The model is created as a **Draft** at this point, nothing is uploaded yet. Naming happens before you pick a source because the same draft can be filled in either way, by file or by HuggingFace, on the next screen.
## Step 3: Upload the archive on the File tab
The model card opens on an **Add Model** card with two tabs, **File** and **HF model**. Stay on **File**: drag and drop your `.zip` onto the dashed area, or click **Browse Files**.
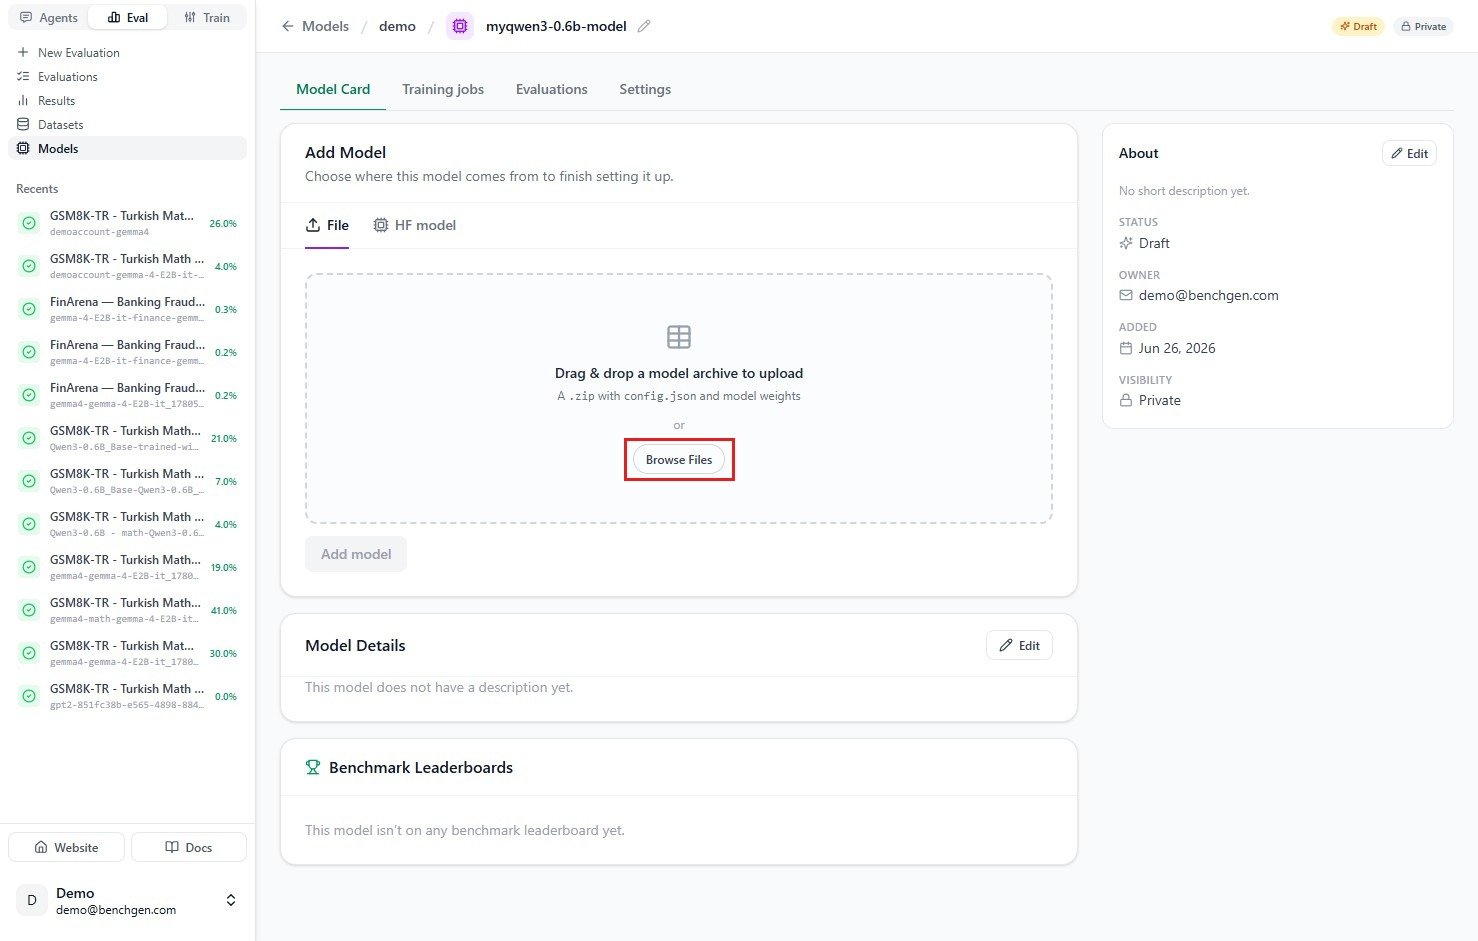 The **Add model** button underneath stays disabled until a valid file is attached, BenchGen validates the archive in your browser before it starts uploading, so a bad archive fails immediately instead of after a multi-GB upload.
This is the same **File** tab documented in [Add a Model → Option A — Upload a file](/docs/eval/add-a-model#option-a-%E2%80%94-upload-a-file), whether you get there from Eval's Models page or from here.
## What has to be inside the zip
The **Add model** button underneath stays disabled until a valid file is attached, BenchGen validates the archive in your browser before it starts uploading, so a bad archive fails immediately instead of after a multi-GB upload.
This is the same **File** tab documented in [Add a Model → Option A — Upload a file](/docs/eval/add-a-model#option-a-%E2%80%94-upload-a-file), whether you get there from Eval's Models page or from here.
## What has to be inside the zip
 | Required | Details |
| ------------- | --------------------------------------------------------------------------------------------------------------------------- |
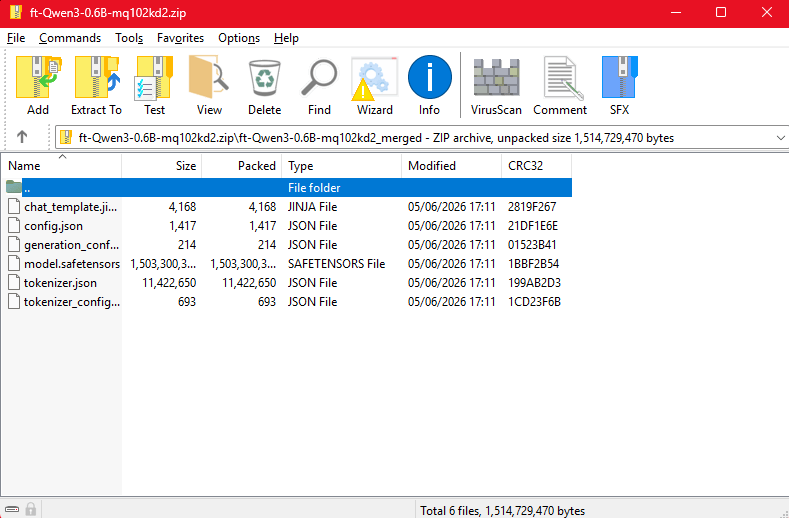
| `config.json` | At the root of the archive, or in a subfolder. This is what makes it a recognizable HuggingFace-format model. |
| Model weights | At least one of: `*.safetensors` (preferred), `pytorch_model.bin` (or `model.bin`), `tf_model.h5`, or `flax_model.msgpack`. |
| Recommended for fine-tuning | Why |
| -------------------------------------------------------------------- | ------------------------------------------------------------------------------------------------------------------------------------------------------ |
| `tokenizer.json`, `tokenizer_config.json`, `special_tokens_map.json` | Training needs the exact tokenizer the model was built with. These ship by default if you download a full repo snapshot instead of hand-picking files. |
No executables or scripts, inside the zip or in its filename. Archives containing `.exe`, `.sh`, `.bat`, `.py`, and similar are rejected outright, and so is an archive whose own filename looks like one of those.
## Which HuggingFace models you can and can't use
**GGUF models cannot be fine-tuned.** GGUF is an inference-only, quantized format for llama.cpp / Ollama, there's no full-precision weight tensor for a LoRA adapter to attach to. If a repo's name ends in `-GGUF`, that's the tell.
| Format on HuggingFace | Can you fine-tune it? |
| ----------------------------------------------------------------------- | ----------------------- |
| Standard `transformers` repo (`.safetensors` or `.bin` + `config.json`) | Yes |
| `-GGUF` repos (llama.cpp / Ollama quantized) | No, inference-only |
| `-AWQ`, `-GPTQ` (pre-quantized inference formats) | No, same reason as GGUF |
If you want a smaller memory footprint during training, use the training job's own **Quantization** option (QLoRA-style), not a pre-quantized checkpoint downloaded from the Hub.
### A short model catalog to start from
Open-weight, instruction-tuned models that are known to work well as fine-tuning bases:
| Model | Params | Notes |
| ---------------------------------- | ------ | ------------------------------- |
| `Qwen/Qwen2.5-7B-Instruct` | 7B | Strong general-purpose baseline |
| `Qwen/Qwen2.5-Math-7B-Instruct` | 7B | Math-tuned variant |
| `meta-llama/Llama-3.1-8B-Instruct` | 8B | Strong general reasoner |
| `microsoft/Phi-3.5-mini-instruct` | 3.8B | Fast, fits on smaller GPUs |
Prefer the smallest model that's plausible for your task. A 1.5B–8B instruction-tuned model with QLoRA trains far faster and cheaper than reaching for the largest checkpoint you can find.
## Step 4: Confirm the model is ready
Once the upload finishes, BenchGen registers the model and provisions its endpoint. The status flips from **Draft** to **ready**, and the model card fills in its **model name**, **Endpoint URL**, access **Token**, and format (for example **SAFETENSORS**).
| Required | Details |
| ------------- | --------------------------------------------------------------------------------------------------------------------------- |
| `config.json` | At the root of the archive, or in a subfolder. This is what makes it a recognizable HuggingFace-format model. |
| Model weights | At least one of: `*.safetensors` (preferred), `pytorch_model.bin` (or `model.bin`), `tf_model.h5`, or `flax_model.msgpack`. |
| Recommended for fine-tuning | Why |
| -------------------------------------------------------------------- | ------------------------------------------------------------------------------------------------------------------------------------------------------ |
| `tokenizer.json`, `tokenizer_config.json`, `special_tokens_map.json` | Training needs the exact tokenizer the model was built with. These ship by default if you download a full repo snapshot instead of hand-picking files. |
No executables or scripts, inside the zip or in its filename. Archives containing `.exe`, `.sh`, `.bat`, `.py`, and similar are rejected outright, and so is an archive whose own filename looks like one of those.
## Which HuggingFace models you can and can't use
**GGUF models cannot be fine-tuned.** GGUF is an inference-only, quantized format for llama.cpp / Ollama, there's no full-precision weight tensor for a LoRA adapter to attach to. If a repo's name ends in `-GGUF`, that's the tell.
| Format on HuggingFace | Can you fine-tune it? |
| ----------------------------------------------------------------------- | ----------------------- |
| Standard `transformers` repo (`.safetensors` or `.bin` + `config.json`) | Yes |
| `-GGUF` repos (llama.cpp / Ollama quantized) | No, inference-only |
| `-AWQ`, `-GPTQ` (pre-quantized inference formats) | No, same reason as GGUF |
If you want a smaller memory footprint during training, use the training job's own **Quantization** option (QLoRA-style), not a pre-quantized checkpoint downloaded from the Hub.
### A short model catalog to start from
Open-weight, instruction-tuned models that are known to work well as fine-tuning bases:
| Model | Params | Notes |
| ---------------------------------- | ------ | ------------------------------- |
| `Qwen/Qwen2.5-7B-Instruct` | 7B | Strong general-purpose baseline |
| `Qwen/Qwen2.5-Math-7B-Instruct` | 7B | Math-tuned variant |
| `meta-llama/Llama-3.1-8B-Instruct` | 8B | Strong general reasoner |
| `microsoft/Phi-3.5-mini-instruct` | 3.8B | Fast, fits on smaller GPUs |
Prefer the smallest model that's plausible for your task. A 1.5B–8B instruction-tuned model with QLoRA trains far faster and cheaper than reaching for the largest checkpoint you can find.
## Step 4: Confirm the model is ready
Once the upload finishes, BenchGen registers the model and provisions its endpoint. The status flips from **Draft** to **ready**, and the model card fills in its **model name**, **Endpoint URL**, access **Token**, and format (for example **SAFETENSORS**).
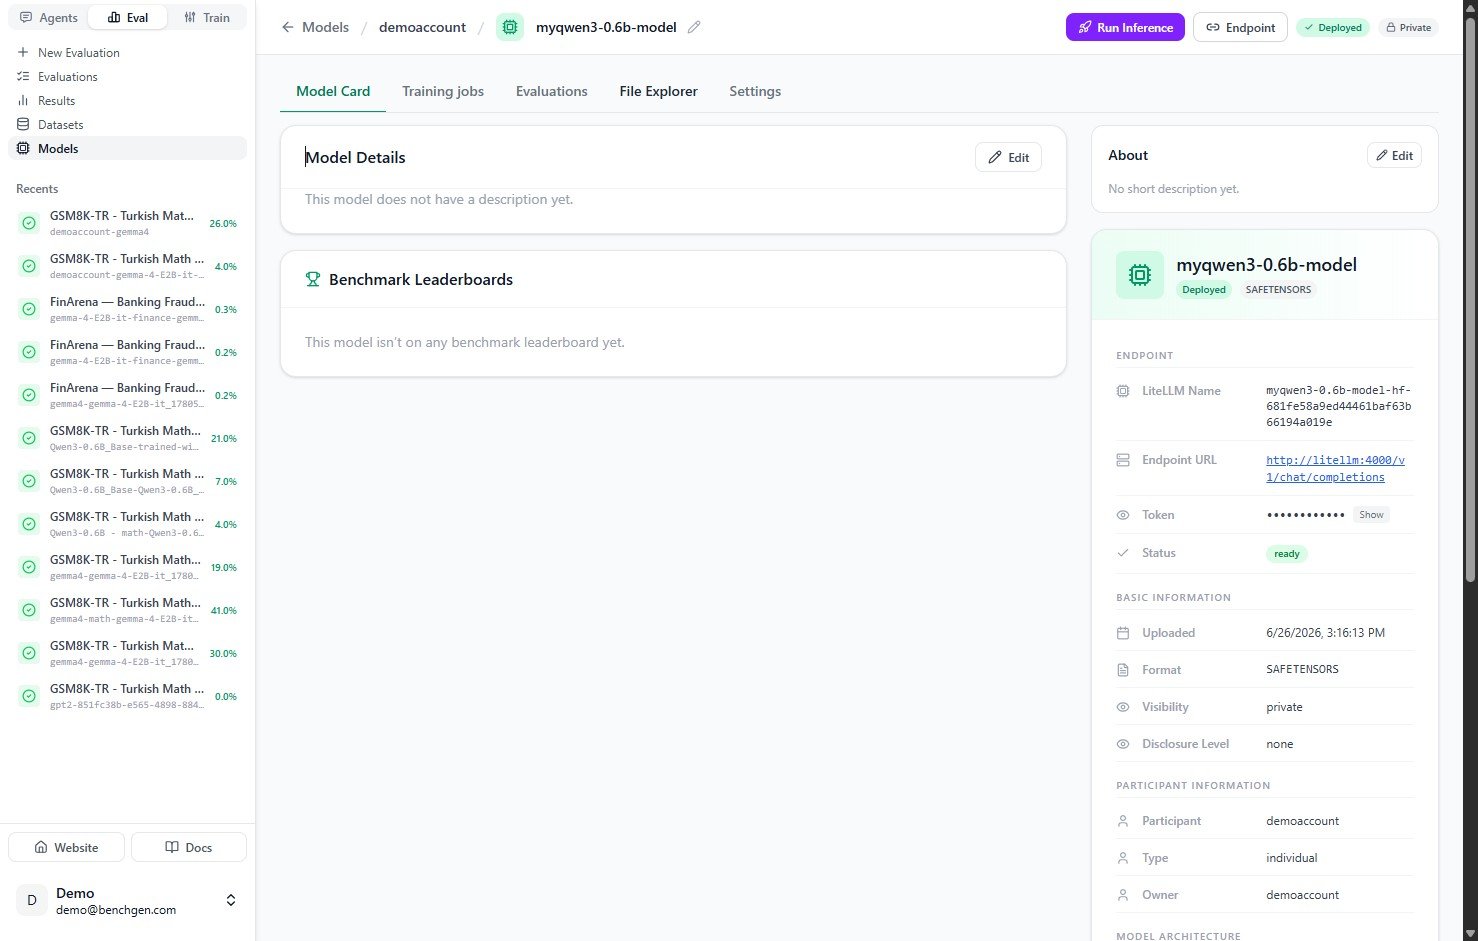 It now appears under **My Models** in the Base Model picker on the [Fine-tune a Model](/docs/train/fine-tune-a-model) form, ready to select as your starting point.
## Next Steps
Pick this model as your base and configure the run.
The same Add Model flow, covering the HuggingFace import path too.
It now appears under **My Models** in the Base Model picker on the [Fine-tune a Model](/docs/train/fine-tune-a-model) form, ready to select as your starting point.
## Next Steps
Pick this model as your base and configure the run.
The same Add Model flow, covering the HuggingFace import path too.